Look at me, blogging away...
Looked (and put an offer in) at a house today. Is it sad that the first place I want to check out is the garage? Maybe...
This house is the old 2-car-garage with 2 separate doors. Now everyone has the big 16' or 18' wide door. The garage is about 17 feet deep, and for the mustang being 15.2' long, you're not talking about a lot of space to move around. Otherwise the house is perfect.
What to do, what to do...(build a giant workshop in the backyard? Well okay!)
Wednesday, May 7, 2014
Monday, May 5, 2014
Finally, it has arrived.
For about 4 years now, I've been searching for the perfect (and perfectly-priced) T5 transmission. Specifically, a WC (World Class) T-5 from a 4-cylinder Mustang. 3 or 4 years ago, you could get one of these for about $325 rebuilt. Now you can't even buy a used, broken T-5 for less than $400 it seems. And good luck trying to find one for a 4-cylinder.
Well last week, while in Germany, I found one listed on Craigslist. It's out of an '87 2.3L 4-cyl, shifts well, but it's nearly 30 years old. I'll probably still rebuild it. Seeing as most rebuild kits are about $250 or so these days, probably looking at $450 total. But, everything else is basically done, so the engine & trans can go back into the car once finished. Very exciting.
Well last week, while in Germany, I found one listed on Craigslist. It's out of an '87 2.3L 4-cyl, shifts well, but it's nearly 30 years old. I'll probably still rebuild it. Seeing as most rebuild kits are about $250 or so these days, probably looking at $450 total. But, everything else is basically done, so the engine & trans can go back into the car once finished. Very exciting.
Sunday, May 4, 2014
How time flies
Wow...it's been a while, to say the least. Warning: by updating this, I'm not promising to "get back in the swing of things" (because I know I'll fail miserably).
A lot has changed since the last update. Kiddo #1, Kiddo #2 (on the way). Sold our house/mini-farm and moved out. That, specifically, is what led me back to this blog. As many of you know, moving is not fun. Packing every earthly possession into boxes, driving it (somewhere), and putting it somewhere new is a hassle. Especially when that possession is a giant hunk of metal, up on jackstands (with no suspension/wheels).
So, over the last 9 months - year, here are some things that have been done to the Mustang:
Installed:
All this was done in preparation for us moving from our current house (future house yet to be found...but it will have a bigger garage!). The stance on the Mustang - with the 480# springs and Arning drop - looks incredible. I figure once the engine and transmission are put into the engine bay, the car should drop another .5-.625", which would be about 2-1/4" total drop. Looks fantastic. I'm stoked. So for now, I'll go ahead and close out this post... gotta recover some old documents and get back out there house hunting.
- Radiator Support Panel removed from front end
- New Radiator Support Panel welded on
- Arning ("Shelby") Drop performed
- Front end (frame rails and firewall -> forward) coated with Southern Polyurethanes (SPI) Epoxy Primer & Eastwood 2K Ceramic Underhood Black paint.
- Rear end primed/painted with SPI epoxy primer
Installed:
- NPD 480# coil springs
- Roller bearing spring perches
- CSRP Disk Brake Swap
- Power brake booster & dual Master Cylinder
- New brake lines
- 4.5 Leaf mid-eye leaf springs
- Ford 8" rear end with 2.79 gears (to be upgraded at a later date)
- 15x7 wheels with 205/75r15 tires (temporary)
- Export Brace
All this was done in preparation for us moving from our current house (future house yet to be found...but it will have a bigger garage!). The stance on the Mustang - with the 480# springs and Arning drop - looks incredible. I figure once the engine and transmission are put into the engine bay, the car should drop another .5-.625", which would be about 2-1/4" total drop. Looks fantastic. I'm stoked. So for now, I'll go ahead and close out this post... gotta recover some old documents and get back out there house hunting.
Friday, December 2, 2011
Thoughts running through my head
I couldn’t get any sleep last night, so I wrote this to help myself fall asleep. There’s some rambling. But you could technically call it an update.
I’m at a complete impasse on what to do about the floorpan. See, the right rear floorpan has a lot of little holes in it. It’s pretty bad, so I bought a replacement floorpan. The problem is, 1) I don’t know how to weld, and 2) I’m afraid that if I have it welded in by someone, we will find a lot worse stuff in the frame rail underneath. We might not. But if we do, then we are talking about a LOT more work.
So I’ve come to the question of: do I paint over it with Silver POR15 and live with a feeling of regret, knowing that I took the sorry-approach of “just covering it up,” or do I take the expensive approach of doing it right? Regarding fixing it later – let’s be honest, it’s a lot more time to take everything back out of the interior, remove the floorpan, weld in a new one, re-seal everything, re-prime, and re-paint.
The holes themselves aren’t that big, and the floor is actually pretty strong, but there are a lot of them. Another option is the POR-Mesh crap I bought, which is just fiberglass cloth. I could apply that on top, but, it’s not really the “right” way to do it.
I feel like I’ll explode if I think about this anymore…so let’s move on to the other stuff.
I have said for a while, that, I’d at least like to get the car to a “roller” state by the end of the year, but it doesn’t look like that is going to happen. Scott Drake continues to have problems with their leaf spring vendor and the shipment isn’t expected until next January (yea, right).
One huge pitfall in getting the car to a “roller” standpoint is the rearend. The rearend has 2.79 gears, and I’d like to upgrade to 3.25:1 for the T5 swap. 3.25 gears may be in the budget, but the cost to install them sure isn’t. I’ll just have to wait until some more money comes my way, to do that (forecast: not good :-) ). So now the dilemma becomes clear, I hope. I could install the rear axle housing, with the backing plates bolted on and all, but the axles will have to go in after the 3rd member, and the 3rd member can’t go in until new gears are installed. Lifting that up, and installing it, should be a blast.
Other than that, everything has just been a whirlwind lately. The brake lines I ordered from CJ Pony Parts didn’t fit at all, so I’m going to have to mess with them and make some changes, which really hacks me off (they’re pre-bent…come on!). With that, all the brake components for the entire car have been purchased, with the exception of 1 extra 6” steel line from the MC to the Distribution block (about $5).
The T5 is still at a standstill, and will stay that way, until I get the engine bay painted.
Ah dangit, I just remembered, I need to go get a new radiator support piece. This thing is never going to be done.
Monday, November 14, 2011
8" Rears
There's a lot of info out there about the 9" rears. When it comes to the 8" rear however, we who are looking for swappable parts and info are mostly out of luck. I thought I would start compiling some data to assist anyone else that may be trying to find parts, etc. Here's what I've got so far:
Makes/models/years that had the Ford 8" rear. Gear ratios are unknown at this time, but expect the usual - >4.00 in the high-end models, <3.00 for the gas-savers, and between 3.00 & 4.00 for most everything else.
(Info from Rockauto)
While it's not the best idea to install a used Ring & Pinion, I wouldn't think ill of it if you found a low mileage car that looks like it's be taken care of, and installed a R&P that had minimal wear.
My goal is to find a 3.25 Open Diff ring & pinion, in good shape. New gears are ~$180, plus a rebuild of ~$200. Cutting costs is half the battle with my Mustang, and so if I find a good set, I'll use it.
Makes/models/years that had the Ford 8" rear. Gear ratios are unknown at this time, but expect the usual - >4.00 in the high-end models, <3.00 for the gas-savers, and between 3.00 & 4.00 for most everything else.
| FORD | E-100 | (1968 - 1974) |
| FORD | FAIRLANE | (1962 - 1967) |
| FORD | FAIRMONT | 1978 |
| FORD | FALCON | (1964 - 1970) |
| FORD | FALCON SEDAN DELIVERY | (1964 - 1965) |
| FORD | GRAN TORINO | (1972 - 1976) |
| FORD | GRANADA | (1975 - 1978) |
| FORD | LTD | (1965 - 1978) |
| FORD | LTD II | (1977 - 1978) |
| FORD | MAVERICK | (1970 - 1977) |
| FORD | MUSTANG | (1964 - 1973) |
| FORD | MUSTANG II | (1974 - 1978) |
| FORD | PINTO | (1971 - 1980) |
| FORD | RANCHER | 1972 |
| FORD | RANCHERO | (1964 - 1978) |
| FORD | TORINO | (1968 - 1976) |
| MERCURY | BOBCAT | (1975 - 1980) |
| MERCURY | CAPRI | (1970 - 1978) |
| MERCURY | COMET | (1962 - 1977) |
| MERCURY | COUGAR | (1967 - 1970) |
| MERCURY | COUGAR BOSS 302 | 1969 |
| MERCURY | COUGAR BOSS 429 | 1970 |
| MERCURY | COUGAR COBRA JET | (1969 - 1970) |
| MERCURY | COUGAR XR-7 | (1967 - 1970) |
(Info from Rockauto)
While it's not the best idea to install a used Ring & Pinion, I wouldn't think ill of it if you found a low mileage car that looks like it's be taken care of, and installed a R&P that had minimal wear.
My goal is to find a 3.25 Open Diff ring & pinion, in good shape. New gears are ~$180, plus a rebuild of ~$200. Cutting costs is half the battle with my Mustang, and so if I find a good set, I'll use it.
Sunday, November 13, 2011
Brakes
Replacing brake lines is easy.
Replacing stock 1966 brake lines (single-bowl master cylinder, all drum brakes) becomes quite a bit more difficult when you have Granada discs up front, a dual master cylinder, and dual exhaust.
I've been working on ordering my brake parts and lines lately, and I've realized how Frankenstein-ish my car is. It will be a dual-exhaust car, which only came on the 66 HIPO V8s. It has front discs, which came on some V8s. It has 10 x 1-3/4" brakes, which are equipped on my 8" rearend. None of this came on my car, stock, obviously.
In addition to this stuff (which really isn't too bad), is the brake line kit I need to order. 66's never came with dual master cylinders, so it takes a little bit of rerouting when it comes to the lines from the MC to the Distribution Block. I've decided to purchase 66 Stainless steel, dual exhaust disc/drum brake lines, and I will fabricate what remains to finish off the system.
In addition to this, I've already purchased all new drum components for the rear. A little tip if you're ordering off of Rockauto.com (my favorite place to order replaceable components), is that the wheel cylinders you want for the 8" rear are the ones with a 7/8" bore (will sometimes say "from 04/1966").
Thursday, November 3, 2011
Scored a Compressor!
I'm excited about the deal I scored today! I had been monitoring the sales and prices of compressors around here and online, when I ran across the Morgan Series 60 gallon compressor on Northern Tool's website. It's Reconditioned, but I don't mind as I picked up a 1-year warranty for no-hassle replacement. Here are the compressor's specifications:
HP | 3.7 |
Volts | 240 |
CFM at 90 PSI | 11.5 |
Max. PSI | 155 |
Tank Type | Vertical |
Air Tank Size (gal.) | 60 |
Stage | Single |
Drive | Belt |
Motor Phase(s) | Single |
Air Outlet Size (in.) | 3/8 |
Portable or Stationary | Stationary |
Pump | Cast iron, in-line twin, oil lubed |
Manufacturer Warranty | 1 month parts / 1 month labor |
Ship Weight | 245.0 lbs |
Item# | 211112 |
The hardest part about it is going to be the unloading. I'm pretty confident about securely strapping it down and transporting it home (a mere 3 miles or so), but unloading it and carrying it into the garage will be tough. As well as wiring a 240V connection. And 240V 40A circuit breakers aren't cheap, either. :-)
As for what I plan on using this for, I will be shooting primer and some paint, as well as hooking it up to a sandblaster and cleaning up a few small parts for the car, which will need to be painted. That will be wonderful :-D
The other thing I've been working on is the tedious - and dirty - task of removing the undercoating. First, I had to replace my Multi-Tool with a new one after only a few weeks, due to poorly made junk. But I don't really mind...swapping it out was free and I paid nearly nothing for it to begin with.
So I began using the scraper blade attachment, and sort of skimmed off the thick layer of undercoating. There appeared to be 2 types of undercoating. One was black/darker, and one was very light, almost beige. The darker undercoating came off with little effort. The beige undercoating took LOTS of elbow grease to get it off, and even then, a lot remained stuck on. Anyway, after a while, I moved on to the angle grinder, taking off the light coating of undercoating that remained. The result was phenomenal! The Red Oxide Primer underneath was still in great shape, with very little to no surface rust. There are a few holes, though, from above (floor pans). That's a different story.
So, I spent the better part of the evening vacuuming all that crap off the floor, and I'll be back under it next week, scraping and grinding and vacuuming some more. But until then, I've got to dream about painting!
Thanks for stopping in.
Saturday, October 29, 2011
Air and Paint and What to do?
I've been inundated with baseball lately, but in the meantime, I've been doing quite a bit of research on all this painting stuff. Here's about what I have come up with, for my paint setup.
For my compressors, I'm still undecided on which method I will go, but here are the two I'm looking at. In both cases, I am coupling 2 compressors together, as it is much cheaper than buying one large compressor.
Compressor Option #1
The next step in my research was to find what sort of sequence I would be doing all this in. If you remember back, I'm planning on using a little bit of POR15 (not everywhere like crazy), epoxy primer, seam sealer, and some engine bay paint. Actual exterior paint will be determined at a later date.
So here's what I came up with:
I'm still not decided on what guns I want to use, but Husky has a 2-gun kit, complete with extra hoppers and a full cleaning set. It's a pretty good deal, too.
For my compressors, I'm still undecided on which method I will go, but here are the two I'm looking at. In both cases, I am coupling 2 compressors together, as it is much cheaper than buying one large compressor.
Compressor Option #1
- Harbor Freight's 2HP 10-gallon Compressor (2)
- 20 Gallons combined volume
- 12.4 SCFM @ 40 psi (each compressor is 6.2 SCFM @ 40 psi)
- 120V, 14.1 A
- Price is $220
- Husky 1.8HP 20-gallon Compressor (2)
- 40 Gallons combined volume
- 12.2 SCFM @ 40 psi (each compressor is 6.1 SCFM @ 40 psi)
- 115V, 13.5 A
- Price is $240
- (Note, this just went out of stock...how awesome :-\ )
The next step in my research was to find what sort of sequence I would be doing all this in. If you remember back, I'm planning on using a little bit of POR15 (not everywhere like crazy), epoxy primer, seam sealer, and some engine bay paint. Actual exterior paint will be determined at a later date.
So here's what I came up with:
1. Sand/Strip the Engine Bay, Interior, and Underbody
a. I've now been informed that, if the bond between the stock paint on the interior, and the metal, is good, then just scuff it up really good and epoxy prime it. This will keep me from having to do so much Chemical stripping, which I am not a fan of.
2. Prep the Interior and Underbody where POR15 will be applied (Marine Clean and Prep & Ready)
3. Apply POR15 (or...?) to the floor pans, and possibly some areas in the engine bay.From here I can move on to taping off all the underbody (which will be primed in Red Oxide) and the engine bay (now painted in 2K Underhood Black), and Prime/Paint all the exterior. Thankfully though at this point I should be able to reassemble most of the drivetrain/suspension/steering, so I can move the car if necessary...perhaps to a real painter.
4. Spray on Epoxy Primer over POR15 while tacky? (Still not sure on this)
5. Apply Seam Sealer where there are seams.
6. Spray on 2nd coat of Epoxy Primer over POR15, and coat the rest of the areas in primer.
7. Paint everything from the firewall > forward with Eastwood's 2K Ceramic Underhood Black (as well as the front frame rails behind the firewall). I'm going to have to build a mini paint-booth around my engine bay for this.
I'm still not decided on what guns I want to use, but Husky has a 2-gun kit, complete with extra hoppers and a full cleaning set. It's a pretty good deal, too.
Thursday, October 27, 2011
Interior Removal
With the steering box unbolted (but unable to remove due to the steering column), I figured it was time to get to work on the interior.
Ironically as I was removing seats, carpet, etc., from the interior I thought to myself "ah, all done taking all the junk out the interior."
Not so!
To remove everything from the interior, for paint and such, is a lot more work than I previously thought. First of all, you have all the seam sealer. There is a ton of it, but a Harbor Freight Multi-Tool makes extremely quick work of it, and a scraper gets the rest. Then it's on to the window side of things. First, remove the windlace along the door jamb, which is holding the rear quarter panel trim to the jamb. Next, the the screws holding on the rear quarter panel trim. Then off comes the quarter-window crank (a small Allen wrench is used). Once the crank slides off, the panel trim comes off. Underneath, you (should) have a large piece of thin cardboard-type material, which is held to the body by spots of some adhesive (glue-like-putty stuff?).
Carefully remove the cardboard stuff, which will likely tear anyway, and start removing the 4 screws that hold the scissor-jack assembly in (mine was already disconnected from the quarter window...that explains why it never worked). Through some Houdini-effort, I was finally able to pull this assembly through the access hole. All that remains now is the structural pieces inside the quarter-panel, and the quarter window itself. I'll have to look in my shop manual to see how these are removed.
The rear quarter panel trim has a distinct vinyl-stamped texture in it, and is not reproduced. I'll be stripping the paint off of these, epoxy priming, and re-painting another day. Speaking of that, check back soon for an update on the painting mess :-) .
So that's one side. Now I've just got to get to the other. And 100 other things... sigh.
Tuesday, October 18, 2011
Lots of work and not much done
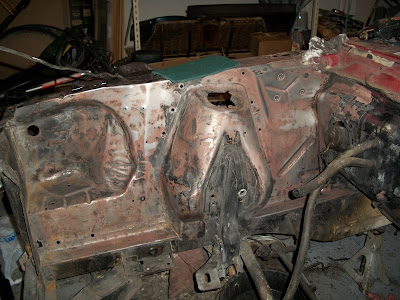
I knew this would be tough, but I really didn't expect this much work. I've been working on removing the paint from the engine bay, and it's a very slow process. I think part of this is just due to the fact that I didn't leave the Citristrip on there long enough (it's hard to block out ~4-5hours of time for this), but part of it is, the stuff just isn't a 1-time-does-it-all product.
But the worst part of it all is the paint remover afterwash. This is the stuff that inactivates the paint remover, and washes it away.... which sounds great except it:
1) is noxious (hence a respirator),
2) quickly evaporates,
3) Doesn't do all that great of a job of "washing" away the stuff - more like it makes it wet, then evaporates.
So it takes a lot of scotch-brite pads, steel wool, and patience, to get the stuff off. But, I'm somewhat pleased to say that the Passenger side is mostly done, with the only thing remaining being (what appears to be) some primer and a few spots of paint.
While I'm at it, I'll talk about my ideas regarding the paint. I've talked about them multiple times, but I'm still undecided.
All this tedious work brings up the question, why am I taking this engine bay down to clean metal and planning on applying POR15? POR15 is meant to be applied to seasoned (aka rusty) metal, so I have a dilemma. I don't know if I should even bother applying POR15 to the inner fenders, engine bay, etc., if all of that area stayed rust free to begin with (covered by factory paint). Or, do I take the other approach, and apply it to provide further preventative maintenance?
I really like POR15, which, like everything, has benefits and consequences. POR15 is a rust encapsulator, and the biggest fault in my opinion, is that it is UV-sensitive. This means it must be topcoated with another product, and I honestly wonder if I'm just wasting time & money. One thing is for sure - I'm going to apply POR15 to the underside and interior floor. That area WILL rust, even if painted, so getting the POR15 on there should result in a longer-lasting floorpan.
As for any other news, I can't say there is too much. I've mainly just worked on the metal. I test-fit my Export Brace, which looks like it should go in with minimal problems. The heater has been removed to aid in firewall paint removal, and should also help me get some more of the crap out of the cowl area.
Thanks for checking in.
Monday, September 26, 2011
Cutting carefully
I needed to remove the stock shock tower braces from the shock towers, and I wanted to do so by drilling out the spot welds, but not drilling through the shock tower. Essentially, imagine you have two pieces of sheet metal laying on top of one another, and the goal is to cut through only the top layer. I picked up a 3/8" Double Sided Rotary Spot Weld Cutter from Harbor Freight. This is essentially a 3/8" hole saw, but the center point is a spring-loaded adjustable pin, which depresses into a center-punch mark, and allows the "hole saw" to cut through a top level of material. The trick, as someone joked about, was having "the hands of a surgeon." Now, I don't by any means have the hands of a surgeon, haha, but I did work VERY slow and cautiously. If you'd like to follow the same approach as myself, here's what tools you will need:
Hammer
Center Punch
Spot Weld Cutter (link above)
A few steel, sharp chisels (I would buy these from Harbor Freight because you'll likely destroy the blade...)
Drill
Pliers
*Optional but makes things much easier - Angle Grinder with Cutoff wheel and grinding wheel (or sandpaper disc)
Now, to start, I unbolted the braces from the firewall to the shock tower, so I was left with just the shock tower brace. You can look closely at the brace and notice there are about 5-6 spot welds holding it on. I used the cutoff wheel to cut off all the extra material that isn't welded. This isn't an option if you want to keep them; it just makes it easier to get to the back side.
First things first - this will take a while! Go very slow, doing one step at a time, and you'll probably have to switch between the different methods frequently to prevent cutting through.
To start, hammer the center punch into the little divets (spot welds). This will be where the drill bit is centered.
Next, place the drill bit into the drill and put the center pin into the punch location. Accelerate the drill before pushing it into the material. These bits "walk" very easily, and you don't want to screw up the center punch park, because drilling a straight hole will become very difficult. The approach you want to take when drilling through the material is several quick, small, pushes of the drill into the material. Remember, the pin is spring-loaded, so that is somewhat helpful. Don't sit on the drill and grind it down into the material because you are sure to go right through both pieces of metal.
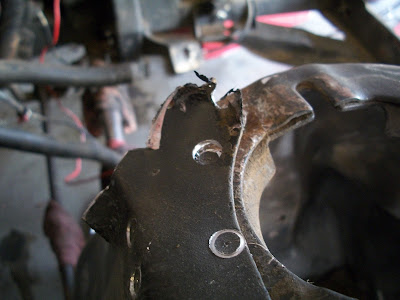
Here's a picture of the drilling being started (bottom of image) and one that is already done (center of image).
After doing this for a few seconds, switch over to the hammer and chisel. Place the chamfer-side against the shock tower, and chisel a bit, just to pry the two pieces of metal apart, and (very slowly) bend it upwards. I'm only talking like 1/32" - not a lot. Chisel around all sides of the hole you just drilled and you'll slowly see that the metal is starting to separate. If, when doing this, you need to drill a little more, switch back, drill some, then chisel some more. Slow and steady wins the race :-)
After a bit of this, you'll notice that the chisel will separate the cylindrical slab of "spot weld metal" from the shock tower brace - this is exactly what you're going for. You can move onto the next spot weld, and later you can go back over this with a grinding disc or a sandpaper-disc to grind it flush with the shock tower.

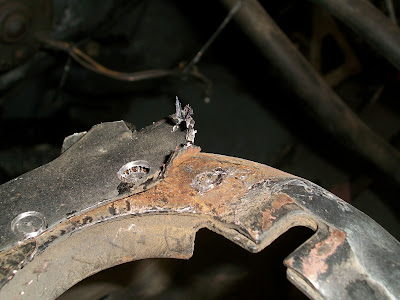
Here are the spot welds, with the shock tower brace completely cut off.

Here is how they look finished; drilled out and sanded down to the shock tower.


*******************************************
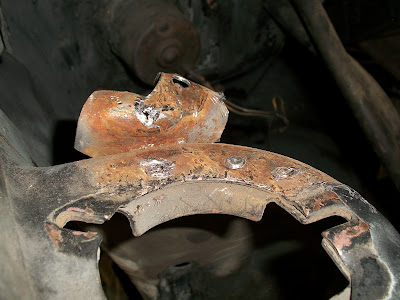
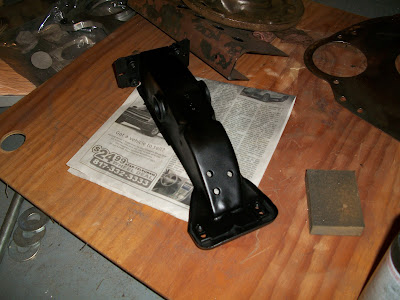
Another thing I worked on last week was getting my pedals and Pedal Support Brace all painted. Everything has been cleaned and is ready to be installed the in car. After the support bracket was welded with the ballbearing clutch conversion kit pieces, I painted it. I also removed the pads from the pedals and painted them as well (after sanding them down of course). I think it turned out fantastic - here's how everything looks:


*******************************************
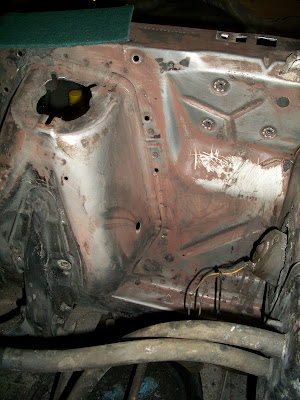
The last chore of the week was removing paint from the engine bay. Someone had suggested Easy-Off Oven Cleaner, which didn't do much as far as paint removal (it did remove some, and it removed quite a bit of grease...just not what I was looking for). So I did some research and went with a non-toxic cleaner named Citristrip. I plan on getting some before and after pics this week to show the cleaner's progress.
Still no news on the T-5. The guy who owns the shop that builds them has been out of the office, conveniently, every time I call.
Well that's about it for today. Busy week ahead...
Hammer
Center Punch
Spot Weld Cutter (link above)
A few steel, sharp chisels (I would buy these from Harbor Freight because you'll likely destroy the blade...)
Drill
Pliers
*Optional but makes things much easier - Angle Grinder with Cutoff wheel and grinding wheel (or sandpaper disc)
Now, to start, I unbolted the braces from the firewall to the shock tower, so I was left with just the shock tower brace. You can look closely at the brace and notice there are about 5-6 spot welds holding it on. I used the cutoff wheel to cut off all the extra material that isn't welded. This isn't an option if you want to keep them; it just makes it easier to get to the back side.
First things first - this will take a while! Go very slow, doing one step at a time, and you'll probably have to switch between the different methods frequently to prevent cutting through.
To start, hammer the center punch into the little divets (spot welds). This will be where the drill bit is centered.
Next, place the drill bit into the drill and put the center pin into the punch location. Accelerate the drill before pushing it into the material. These bits "walk" very easily, and you don't want to screw up the center punch park, because drilling a straight hole will become very difficult. The approach you want to take when drilling through the material is several quick, small, pushes of the drill into the material. Remember, the pin is spring-loaded, so that is somewhat helpful. Don't sit on the drill and grind it down into the material because you are sure to go right through both pieces of metal.
Here's a picture of the drilling being started (bottom of image) and one that is already done (center of image).
After doing this for a few seconds, switch over to the hammer and chisel. Place the chamfer-side against the shock tower, and chisel a bit, just to pry the two pieces of metal apart, and (very slowly) bend it upwards. I'm only talking like 1/32" - not a lot. Chisel around all sides of the hole you just drilled and you'll slowly see that the metal is starting to separate. If, when doing this, you need to drill a little more, switch back, drill some, then chisel some more. Slow and steady wins the race :-)
After a bit of this, you'll notice that the chisel will separate the cylindrical slab of "spot weld metal" from the shock tower brace - this is exactly what you're going for. You can move onto the next spot weld, and later you can go back over this with a grinding disc or a sandpaper-disc to grind it flush with the shock tower.
Here are the spot welds, with the shock tower brace completely cut off.
Here is how they look finished; drilled out and sanded down to the shock tower.
*******************************************
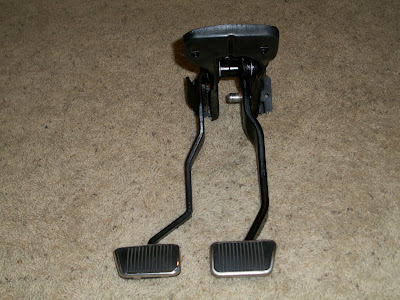
Another thing I worked on last week was getting my pedals and Pedal Support Brace all painted. Everything has been cleaned and is ready to be installed the in car. After the support bracket was welded with the ballbearing clutch conversion kit pieces, I painted it. I also removed the pads from the pedals and painted them as well (after sanding them down of course). I think it turned out fantastic - here's how everything looks:
*******************************************
The last chore of the week was removing paint from the engine bay. Someone had suggested Easy-Off Oven Cleaner, which didn't do much as far as paint removal (it did remove some, and it removed quite a bit of grease...just not what I was looking for). So I did some research and went with a non-toxic cleaner named Citristrip. I plan on getting some before and after pics this week to show the cleaner's progress.
Still no news on the T-5. The guy who owns the shop that builds them has been out of the office, conveniently, every time I call.
Well that's about it for today. Busy week ahead...
Sunday, September 18, 2011
Clutch work and T-5 Stuff
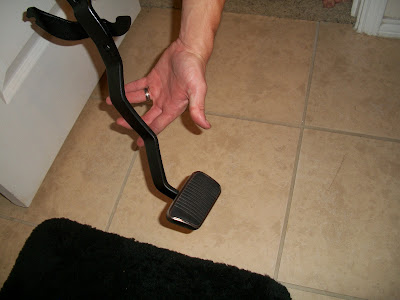
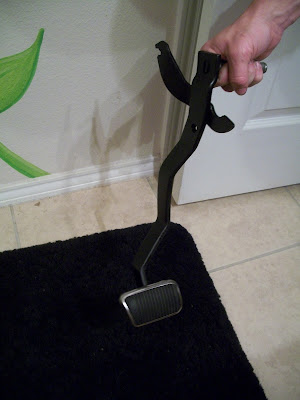
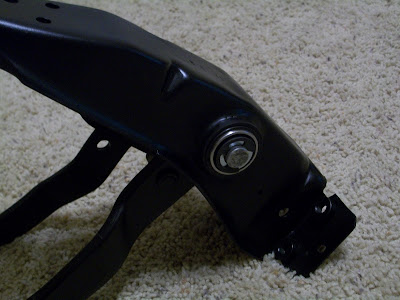
Thanks to my awesomely talented friend, Phillip, I now have the ballbearing clutch pedal conversion kit installed!

It looks fantastic, and (though it isn't hooked up to anything right now), the feel is just sweet. Practically no resistance at all!
Here's a few pictures of the right, left, and bottom. Notice in the third picture, the washers that were tacked on the inside to provide equal spacing of the brake pedal pivot.


* * * * * * * * * * * * * * * * * * * * * * * * * * * * * * * * * * * *
In addition to this, I received my T-5 adapter I bought on eBay (from a company named SMR),

and began the work on adapting the adapter to the bellhousing. Below are the pics of the modifications necessary to adapt the 1967 inline-6 bellhousing to the T-5 adapter.
First, I installed the plate to my bellhousing using the two flathead screws on the left side of the plate. One of the holes on the top right (the one closest to the concentric ring) needs to be transferred to the bellhousing, so I used a transfer punch to locate it.


Then I started drilling. Unfortunately after this step, I found that I screwed up drilling the hole out (really should have started with a smaller pilot hole. Completely my fault... But, I created the hole and enlarged it to the correct 15/32" size.

Once that hole was done, it was time to locate the special "inline 6" bolt hole. This hole is not transferred from the adapter - you will have to find the spot by yourself. The reason, as seen in this thread, is due to the countersunk hole on the bottom right extending over the edge of the bellhousing. So, someone once recommended drilling a hole in the thin part of the adapter, and putting a bolt & nut on there that is just long enough without sticking through the nut into the bellhousing.

The result (which I'll have to get more pics of later), is that the adapter is held onto the bell via 4 fasteners, one on each corner, or so.

Last bit of an update before I'm off for the night; I found out I was incorrect in putting the gasket on the axle before the axle flange...It goes on afterwards Not a big deal, however, since I can just cut it off and put it back on the outside...perhaps use something sticky to keep it in place while attaching, and then it doesn't matter.
Next steps for the Restoration involve getting the new brake lines for the new rear end (dual exhaust kit) which is going to set me back a little more than $100. But, at the same time.....there's a brand new 2V Converted Inline 6 head on eBay right now, and I really want it. But dang it's expensive.
It looks fantastic, and (though it isn't hooked up to anything right now), the feel is just sweet. Practically no resistance at all!
Here's a few pictures of the right, left, and bottom. Notice in the third picture, the washers that were tacked on the inside to provide equal spacing of the brake pedal pivot.
* * * * * * * * * * * * * * * * * * * * * * * * * * * * * * * * * * * *
In addition to this, I received my T-5 adapter I bought on eBay (from a company named SMR),
and began the work on adapting the adapter to the bellhousing. Below are the pics of the modifications necessary to adapt the 1967 inline-6 bellhousing to the T-5 adapter.
First, I installed the plate to my bellhousing using the two flathead screws on the left side of the plate. One of the holes on the top right (the one closest to the concentric ring) needs to be transferred to the bellhousing, so I used a transfer punch to locate it.
Then I started drilling. Unfortunately after this step, I found that I screwed up drilling the hole out (really should have started with a smaller pilot hole. Completely my fault... But, I created the hole and enlarged it to the correct 15/32" size.
Once that hole was done, it was time to locate the special "inline 6" bolt hole. This hole is not transferred from the adapter - you will have to find the spot by yourself. The reason, as seen in this thread, is due to the countersunk hole on the bottom right extending over the edge of the bellhousing. So, someone once recommended drilling a hole in the thin part of the adapter, and putting a bolt & nut on there that is just long enough without sticking through the nut into the bellhousing.
The result (which I'll have to get more pics of later), is that the adapter is held onto the bell via 4 fasteners, one on each corner, or so.
Last bit of an update before I'm off for the night; I found out I was incorrect in putting the gasket on the axle before the axle flange...It goes on afterwards Not a big deal, however, since I can just cut it off and put it back on the outside...perhaps use something sticky to keep it in place while attaching, and then it doesn't matter.
Next steps for the Restoration involve getting the new brake lines for the new rear end (dual exhaust kit) which is going to set me back a little more than $100. But, at the same time.....there's a brand new 2V Converted Inline 6 head on eBay right now, and I really want it. But dang it's expensive.
Friday, September 16, 2011
Wheel bearings on!
I bought a press yesterday afternoon, from Harbor Freight.

So I finally got to install my wheel bearings. Sorry, but I am not paying a shop more money to press on bearings, than it costs to buy a press. It's not even hard...nor did it take more than 10 minutes. Anyway, off my soapbox...
It's fairly straightforward, if you want to buy a HF press and do it yourself (the 12-ton is just barely tall enough, for 65-66 axles). The first thing you do is to make sure the axle gasket goes on first, followed by the loose axle flange (you'll see it in the pictures. Next, with the bearing race surface clean, slide the axle bearing down the axle until it stops. No need to jam it down tight or anything...just let it sit. I forgot to put my axle gasket on, and had to slightly cut it to get it on there...not a big deal but annoying.
Now, turn the axle upside down and slide it onto the press so that the bearing sits against the arbor plates, like so:

Make sure the press is centered, and begin pressing down. It would not hurt to place a thick, flat piece of metal between the press and the axle for good force distribution. Center it as best as possible.
Now, press down, until the bearing rests against the bearing seat (a lip that prevents it from going any farther.
I like to turn the whole axle 180* at this point, and re-press slightly, to make sure it is evenly seated.
Next, repeat the operation with the bearing race, that should have come with your bearing.

Once done, thoroughly go over the axle bearing and retainer to make sure there are no gaps. You want it seated perfectly. Here is the completed assembly:

Don't worry about the creepy noises coming from the press, by the way. That's normal.
Now on to paint the housing!
So I finally got to install my wheel bearings. Sorry, but I am not paying a shop more money to press on bearings, than it costs to buy a press. It's not even hard...nor did it take more than 10 minutes. Anyway, off my soapbox...
It's fairly straightforward, if you want to buy a HF press and do it yourself (the 12-ton is just barely tall enough, for 65-66 axles). The first thing you do is to make sure the axle gasket goes on first, followed by the loose axle flange (you'll see it in the pictures. Next, with the bearing race surface clean, slide the axle bearing down the axle until it stops. No need to jam it down tight or anything...just let it sit. I forgot to put my axle gasket on, and had to slightly cut it to get it on there...not a big deal but annoying.
Now, turn the axle upside down and slide it onto the press so that the bearing sits against the arbor plates, like so:
Make sure the press is centered, and begin pressing down. It would not hurt to place a thick, flat piece of metal between the press and the axle for good force distribution. Center it as best as possible.
Now, press down, until the bearing rests against the bearing seat (a lip that prevents it from going any farther.
I like to turn the whole axle 180* at this point, and re-press slightly, to make sure it is evenly seated.
Next, repeat the operation with the bearing race, that should have come with your bearing.
Once done, thoroughly go over the axle bearing and retainer to make sure there are no gaps. You want it seated perfectly. Here is the completed assembly:
Don't worry about the creepy noises coming from the press, by the way. That's normal.
Now on to paint the housing!
Tuesday, September 13, 2011
Housekeeping
I got quite a few things done over the last few days, but haven't posted too much...
I removed the axle bearings and retainers. I still don't know of any shop that will press on axle bearings for cheap, so I might just buy a press and do it myself. Stupid overpriced shop prices...
I also finally got the front leaf spring bolt cut out. That was one of the hardest things to "work on," on this car. But ironically, once I got a the correct size cutoff disc (5" is minimum) and the angle grinder offset the way I wanted it, it came off with a snap.
The third thing I got finished was not really on my own; I had my brake pedal support bracket welded up with Mustang Steve's Ballbearing Clutch Pedal Conversion Kit. I can't wait to get it back tomorrow. As a tip, we found that the large fender washers to be tacked on the inside of the support bracket do not necessarily need to be tack-welded on. They have an ID very close to the shaft, so they will still space as they are intended. I think. We'll see....
Hmm, I also ordered a T-5 Adapter Plate for my C4 to T-5 Swap. It set me back $113, which wasn't too bad considering they're normally $160 + shipping. Now all I have left is the T-5, shifter, clutch kit, and some miscellaneous parts.
The last thing I got done was cleaning up my atrocious garage. Seriously, it was bad. Embarrassing even... My wonderful wonderful wife helped me clean up a ton of crap and load it on the truck to take to the dump. After that, I had a few quarts of ATF that had leaked all over the floor from the C4, that kitty litter made quick work of. I got a new crate to put all my bagged & tagged parts in, and swept the floor of all the dirt/grime/etc. Finally I don't feel as if I'm in a rats nest working.
Well that's all for now. Gotta track down some things and get some more work done.
Thursday, September 1, 2011
An Auto No More
She's gone!
I've always thought "well, if things really go to heck, I can always resort back to the Auto," but that is officially out the window. The auto is gone, and now it's just a matter of time before I can purchase a rebuilt T-5 (hopefully quickly...money burns around here).
With the ATF-sieve sold, I finally have enough money freed up to purchase the T-5, which will leave me with approximately $406 to go on my inline 6 T-5 Conversion. That $406 basically comprises of: Shifter Base, Transmission Mount, Clutch Kit, Throwout Bearing, Roller Pilot Bearing, Shifter, Shifter Boot, Shifter Boot Trim, and a Speedometer Gear. Note that the Shifter alone is $150, so perhaps I can cut a few bucks off by going with a lesser model or a used one...I'm not sure.
Oh, in other news, there's about umpteen jillion gallons of Automatic Transmission Fluid all over my garage right now. Joy, joy. Time to buy some Kitty Litter.
Subscribe to:
Comments (Atom)