Saturday, October 29, 2011

Air and Paint and What to do?

I've been inundated with baseball lately, but in the meantime, I've been doing quite a bit of research on all this painting stuff.  Here's about what I have come up with, for my paint setup.

For my compressors, I'm still undecided on which method I will go, but here are the two I'm looking at.  In both cases, I am coupling 2 compressors together, as it is much cheaper than buying one large compressor.

Compressor Option #1
  • Harbor Freight's 2HP 10-gallon Compressor (2)
  • 20 Gallons combined volume
  • 12.4 SCFM @ 40 psi (each compressor is 6.2 SCFM @ 40 psi)
  • 120V, 14.1 A
  • Price is $220
Compressor Option #2

  • Husky 1.8HP 20-gallon Compressor (2)
  • 40 Gallons combined volume
  • 12.2 SCFM @ 40 psi (each compressor is 6.1 SCFM @ 40 psi)
  • 115V, 13.5 A
  • Price is $240 
  • (Note, this just went out of stock...how awesome :-\ )
 So for $20 more, I get 20 gallons more, though I am getting 2 reconditioned compressors...

The next step in my research was to find what sort of sequence I would be doing all this in.  If you remember back, I'm planning on using a little bit of POR15 (not everywhere like crazy), epoxy primer, seam sealer, and some engine bay paint.  Actual exterior paint will be determined at a later date.

So here's what I came up with:

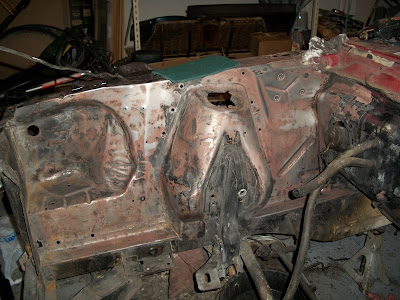
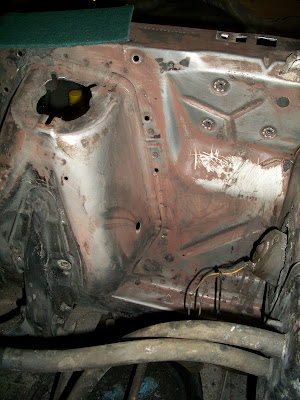
1. Sand/Strip the Engine Bay, Interior, and Underbody
       a.  I've now been informed that, if the bond between the stock paint on the interior, and the metal, is good, then just scuff it up really good and epoxy prime it.  This will keep me from having to do so much Chemical stripping, which I am not a fan of.

2. Prep the Interior and Underbody where POR15 will be applied (Marine Clean and Prep & Ready)
3. Apply POR15 (or...?) to the floor pans, and possibly some areas in the engine bay.

4. Spray on Epoxy Primer over POR15 while tacky? (Still not sure on this)

5. Apply Seam Sealer where there are seams.

6. Spray on 2nd coat of Epoxy Primer over POR15, and coat the rest of the areas in primer.

7. Paint everything from the firewall > forward with Eastwood's 2K Ceramic Underhood Black (as well as the front frame rails behind the firewall). I'm going to have to build a mini paint-booth around my engine bay for this.
From here I can move on to taping off all the underbody (which will be primed in Red Oxide) and the engine bay (now painted in 2K Underhood Black), and Prime/Paint all the exterior. Thankfully though at this point I should be able to reassemble most of the drivetrain/suspension/steering, so I can move the car if necessary...perhaps to a real painter.

I'm still not decided on what guns I want to use, but Husky has a 2-gun kit, complete with extra hoppers and a full cleaning set.  It's a pretty good deal, too.

Thursday, October 27, 2011

Interior Removal

With the steering box unbolted (but unable to remove due to the steering column), I figured it was time to get to work on the interior.

Ironically as I was removing seats, carpet, etc., from the interior I thought to myself "ah, all done taking all the junk out the interior."

Not so!

To remove everything from the interior, for paint and such, is a lot more work than I previously thought.  First of all, you have all the seam sealer.  There is a ton of it, but a Harbor Freight Multi-Tool makes extremely quick work of it, and a scraper gets the rest.  Then it's on to the window side of things.  First, remove the windlace along the door jamb, which is holding the rear quarter panel trim to the jamb.  Next, the the screws holding on the rear quarter panel trim.  Then off comes the quarter-window crank (a small Allen wrench is used).  Once the crank slides off, the panel trim comes off.  Underneath, you (should) have a large piece of thin cardboard-type material, which is held to the body by spots of some adhesive (glue-like-putty stuff?).

Carefully remove the cardboard stuff, which will likely tear anyway, and start removing the 4 screws that hold the scissor-jack assembly in (mine was already disconnected from the quarter window...that explains why it never worked).  Through some Houdini-effort, I was finally able to pull this assembly through the access hole.  All that remains now is the structural pieces inside the quarter-panel, and the quarter window itself. I'll have to look in my shop manual to see how these are removed. 

The rear quarter panel trim has a distinct vinyl-stamped texture in it, and is not reproduced.  I'll be stripping the paint off of these, epoxy priming, and re-painting another day.  Speaking of that, check back soon for an update on the painting mess :-) .

So that's one side.  Now I've just got to get to the other.  And 100 other things... sigh.

Tuesday, October 18, 2011

Lots of work and not much done

I knew this would be tough, but I really didn't expect this much work.  I've been working on removing the paint from the engine bay, and it's a very slow process.  I think part of this is just due to the fact that I didn't leave the Citristrip on there long enough (it's hard to block out ~4-5hours of time for this), but part of it is, the stuff just isn't a 1-time-does-it-all product.

But the worst part of it all is the paint remover afterwash.  This is the stuff that inactivates the paint remover, and washes it away.... which sounds great except it:
1) is noxious (hence a respirator),
2) quickly evaporates,
3) Doesn't do all that great of a job of "washing" away the stuff - more like it makes it wet, then evaporates.

So it takes a lot of scotch-brite pads, steel wool, and patience, to get the stuff off.  But, I'm somewhat pleased to say that the Passenger side is mostly done, with the only thing remaining being (what appears to be) some primer and a few spots of paint.


While I'm at it, I'll talk about my ideas regarding the paint.  I've talked about them multiple times, but I'm still undecided.

All this tedious work brings up the question, why am I taking this engine bay down to clean metal and planning on applying POR15?  POR15 is meant to be applied to seasoned (aka rusty) metal, so I have a dilemma.  I don't know if I should even bother applying POR15 to the inner fenders, engine bay, etc., if all of that area stayed rust free to begin with (covered by factory paint). Or, do I take the other approach, and apply it to provide further preventative maintenance? 

I really like POR15, which, like everything, has benefits and consequences. POR15 is a rust encapsulator, and the biggest fault in my opinion, is that it is UV-sensitive.  This means it must be topcoated with another product, and I honestly wonder if I'm just wasting time & money.  One thing is for sure - I'm going to apply POR15 to the underside and interior floor.  That area WILL rust, even if painted, so getting the POR15 on there should result in a longer-lasting floorpan.

As for any other news, I can't say there is too much.  I've mainly just worked on the metal.  I test-fit my Export Brace, which looks like it should go in with minimal problems.  The heater has been removed to aid in firewall paint removal, and should also help me get some more of the crap out of the cowl area.

Thanks for checking in.