Monday, September 26, 2011

Cutting carefully

I needed to remove the stock shock tower braces from the shock towers, and I wanted to do so by drilling out the spot welds, but not drilling through the shock tower.  Essentially, imagine you have two pieces of sheet metal laying on top of one another, and the goal is to cut through only the top layer.  I picked up a 3/8" Double Sided Rotary Spot Weld Cutter from Harbor Freight.  This is essentially a 3/8" hole saw, but the center point is a spring-loaded adjustable pin, which depresses into a center-punch mark, and allows the "hole saw" to cut through a top level of material.  The trick, as someone joked about, was having "the hands of a surgeon."  Now, I don't by any means have the hands of a surgeon, haha, but I did work VERY slow and cautiously.  If you'd like to follow the same approach as myself, here's what tools you will need:

Hammer
Center Punch
Spot Weld Cutter (link above)
A few steel, sharp chisels (I would buy these from Harbor Freight because you'll likely destroy the blade...)
Drill
Pliers
*Optional but makes things much easier - Angle Grinder with Cutoff wheel and grinding wheel (or sandpaper disc)


Now, to start, I unbolted the braces from the firewall to the shock tower, so I was left with just the shock tower brace.  You can look closely at the brace and notice there are about 5-6 spot welds holding it on.  I used the cutoff wheel to cut off all the extra material that isn't welded.  This isn't an option if you want to keep them; it just makes it easier to get to the back side.


First things first - this will take a while!  Go very slow, doing one step at a time, and you'll probably have to switch between the different methods frequently to prevent cutting through. 


To start, hammer the center punch into the little divets (spot welds).  This will be where the drill bit is centered.


Next, place the drill bit into the drill and put the center pin into the punch location.  Accelerate the drill before pushing it into the material. These bits "walk" very easily, and you don't want to screw up the center punch park, because drilling a straight hole will become very difficult.  The approach you want to take when drilling through the material is several quick, small, pushes of the drill into the material.  Remember, the pin is spring-loaded, so that is somewhat helpful.  Don't sit on the drill and grind it down into the material because you are sure to go right through both pieces of metal.

Here's a picture of the drilling being started (bottom of image) and one that is already done (center of image).
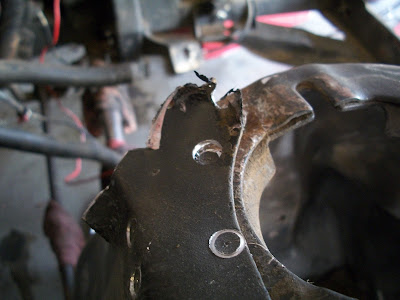


After doing this for a few seconds, switch over to the hammer and chisel.  Place the chamfer-side against the shock tower, and chisel a bit, just to pry the two pieces of metal apart, and (very slowly) bend it upwards.  I'm only talking like 1/32" - not a lot.  Chisel around all sides of the hole you just drilled and you'll slowly see that the metal is starting to separate.  If, when doing this, you need to drill a little more, switch back, drill some, then chisel some more.  Slow and steady wins the race :-)
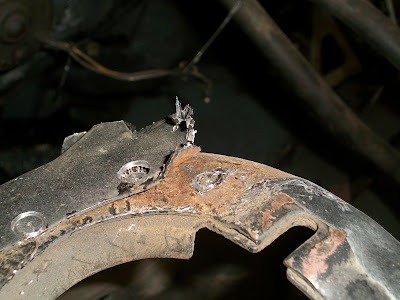


After a bit of this, you'll notice that the chisel will separate the cylindrical slab of "spot weld metal" from the shock tower brace - this is exactly what you're going for.  You can move onto the next spot weld, and later you can go back over this with a grinding disc or a sandpaper-disc to grind it flush with the shock tower.

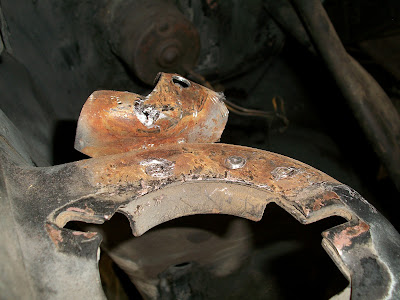


Here are the spot welds, with the shock tower brace completely cut off.


Here is how they look finished; drilled out and sanded down to the shock tower.


*******************************************

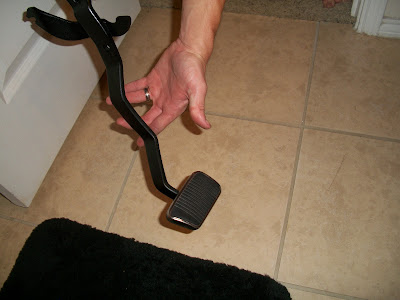
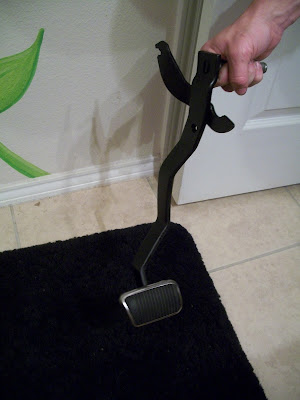
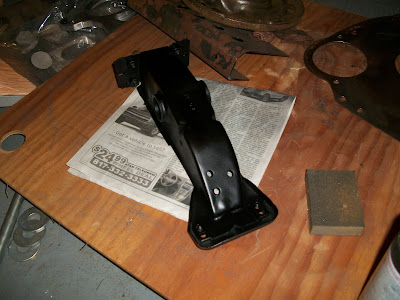
Another thing I worked on last week was getting my pedals and Pedal Support Brace all painted.  Everything has been cleaned and is ready to be installed the in car. After the support bracket was welded with the ballbearing clutch conversion kit pieces, I painted it.  I also removed the pads from the pedals and painted them as well (after sanding them down of course).  I think it turned out fantastic - here's how everything looks:


*******************************************

The last chore of the week was removing paint from the engine bay.  Someone had suggested Easy-Off Oven Cleaner, which didn't do much as far as paint removal (it did remove some, and it removed quite a bit of grease...just not what I was looking for).  So I did some research and went with a non-toxic cleaner named Citristrip.  I plan on getting some before and after pics this week to show the cleaner's progress.

Still no news on the T-5.  The guy who owns the shop that builds them has been out of the office, conveniently, every time I call.

Well that's about it for today.  Busy week ahead...

Sunday, September 18, 2011

Clutch work and T-5 Stuff

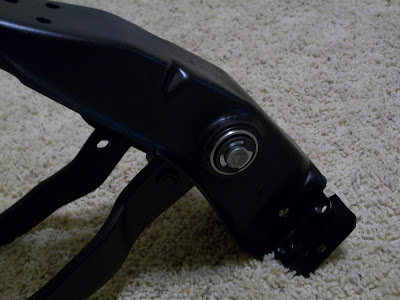
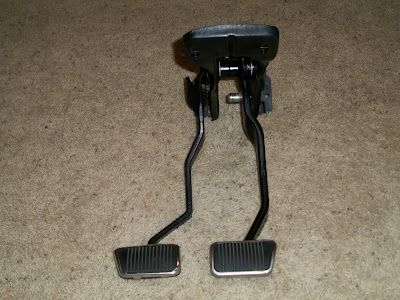
Thanks to my awesomely talented friend, Phillip, I now have the ballbearing clutch pedal conversion kit installed! 


It looks fantastic, and (though it isn't hooked up to anything right now), the feel is just sweet.  Practically no resistance at all! 

Here's a few pictures of the right, left, and bottom.  Notice in the third picture, the washers that were tacked on the inside to provide equal spacing of the brake pedal pivot.


* * * * * * * * * * * * * * * * * * * * * * * * * * * * * * * * * * * *

In addition to this, I received my T-5 adapter I bought on eBay (from a company named SMR),


and began the work on adapting the adapter to the bellhousing.  Below are the pics of the modifications necessary to adapt the 1967 inline-6 bellhousing to the T-5 adapter.

First, I installed the plate to my bellhousing using the two flathead screws on the left side of the plate.  One of the holes on the top right (the one closest to the concentric ring) needs to be transferred to the bellhousing, so I used a transfer punch to locate it.


Then I started drilling.  Unfortunately after this step, I found that I screwed up drilling the hole out (really should have started with a smaller pilot hole.  Completely my fault...  But, I created the hole and enlarged it to the correct 15/32" size.


Once that hole was done, it was time to locate the special "inline 6" bolt hole.  This hole is not transferred from the adapter - you will have to find the spot by yourself.  The reason, as seen in this thread, is due to the countersunk hole on the bottom right extending over the edge of the bellhousing.  So, someone once recommended drilling a hole in the thin part of the adapter, and putting a bolt & nut on there that is just long enough without sticking through the nut into the bellhousing.


The result (which I'll have to get more pics of later), is that the adapter is held onto the bell via 4 fasteners, one on each corner, or so.


Last bit of an update before I'm off for the night; I found out I was incorrect in putting the gasket on the axle before the axle flange...It goes on afterwards  Not a big deal, however, since I can just cut it off and put it back on the outside...perhaps use something sticky to keep it in place while attaching, and then it doesn't matter.

Next steps for the Restoration involve getting the new brake lines for the new rear end (dual exhaust kit) which is going to set me back a little more than $100.  But, at the same time.....there's a brand new 2V Converted Inline 6 head on eBay right now, and I really want it.  But dang it's expensive.

Friday, September 16, 2011

Wheel bearings on!

I bought a press yesterday afternoon, from Harbor Freight.


So I finally got to install my wheel bearings.  Sorry, but I am not paying a shop more money to press on bearings, than it costs to buy a press.  It's not even hard...nor did it take more than 10 minutes.  Anyway, off my soapbox...

It's fairly straightforward, if you want to buy a HF press and do it yourself (the 12-ton is just barely tall enough, for 65-66 axles).  The first thing you do is to make sure the axle gasket goes on first, followed by the loose axle flange (you'll see it in the pictures.  Next, with the bearing race surface clean, slide the axle bearing down the axle until it stops.  No need to jam it down tight or anything...just let it sit.  I forgot to put my axle gasket on, and had to slightly cut it to get it on there...not a big deal but annoying.

Now, turn the axle upside down and slide it onto the press so that the bearing sits against the arbor plates, like so:


Make sure the press is centered, and begin pressing down.  It would not hurt to place a thick, flat piece of metal between the press and the axle for good force distribution.  Center it as best as possible. 

Now, press down, until the bearing rests against the bearing seat (a lip that prevents it from going any farther. 

I like to turn the whole axle 180* at this point, and re-press slightly, to make sure it is evenly seated.

Next, repeat the operation with the bearing race, that should have come with your bearing. 


Once done, thoroughly go over the axle bearing and retainer to make sure there are no gaps.  You want it seated perfectly.  Here is the completed assembly:


Don't worry about the creepy noises coming from the press, by the way.  That's normal.

Now on to paint the housing!

Tuesday, September 13, 2011

Housekeeping

I got quite a few things done over the last few days, but haven't posted too much...

I removed the axle bearings and retainers.  I still don't know of any shop that will press on axle bearings for cheap, so I might just buy a press and do it myself.  Stupid overpriced shop prices...

I also finally got the front leaf spring bolt cut out.  That was one of the hardest things to "work on," on this car.  But ironically, once I got a the correct size cutoff disc (5" is minimum) and the angle grinder offset the way I wanted it, it came off with a snap.

The third thing I got finished was not really on my own; I had my brake pedal support bracket welded up with Mustang Steve's Ballbearing Clutch Pedal Conversion Kit. I can't wait to get it back tomorrow.  As a tip, we found that the large fender washers to be tacked on the inside of the support bracket do not necessarily need to be tack-welded on.  They have an ID very close to the shaft, so they will still space as they are intended. I think.   We'll see....

Hmm, I also ordered a T-5 Adapter Plate for my C4 to T-5 Swap.  It set me back $113, which wasn't too bad considering they're normally $160 + shipping.  Now all I have left is the T-5, shifter, clutch kit, and some miscellaneous parts.

The last thing I got done was cleaning up my atrocious garage.  Seriously, it was bad.  Embarrassing even...  My wonderful wonderful wife helped me clean up a ton of crap and load it on the truck to take to the dump.  After that, I had a few quarts of ATF that had leaked all over the floor from the C4, that kitty litter made quick work of.  I got a new crate to put all my bagged & tagged parts in, and swept the floor of all the dirt/grime/etc. Finally I don't feel as if I'm in a rats nest working.

Well that's all for now.  Gotta track down some things and get some more work done.

Thursday, September 1, 2011

An Auto No More

She's gone!

I've always thought "well, if things really go to heck, I can always resort back to the Auto," but that is officially out the window.  The auto is gone, and now it's just a matter of time before I can purchase a rebuilt T-5 (hopefully quickly...money burns around here).

With the ATF-sieve sold, I finally have enough money freed up to purchase the T-5, which will leave me with approximately $406 to go on my inline 6 T-5 Conversion.  That $406 basically comprises of: Shifter Base, Transmission Mount, Clutch Kit, Throwout Bearing, Roller Pilot Bearing, Shifter, Shifter Boot, Shifter Boot Trim, and a Speedometer Gear.  Note that the Shifter alone is $150, so perhaps I can cut a few bucks off by going with a lesser model or a used one...I'm not sure.

Oh, in other news, there's about umpteen jillion gallons of Automatic Transmission Fluid all over my garage right now.  Joy, joy.  Time to buy some Kitty Litter.

Sunday, August 28, 2011

Rebuilding the 8-inch rear end, Part 2

Thought I should give an update, now that the parts have been ordered and cleaning is nearly complete.

The total cost of the parts, shipped & taxed where necessary, was $92.15.  All parts except the Brake Hardware Rebuild Kit were purchased from Rockauto.  A breakdown of what you'll need:

2 Backing Plate Gasket - Outer ($1.14)
2 Backing Plate Gasket - Inner ($1.40)
2 Axle Bearings ($34.56)
2 Axle Seals ($19.64)
1 Brake Hardware Rebuild Kit ($7.55, from O'Reilly's)
1 set of Brake Shoes ($15.39)
1 Shipping from Rockauto ($12.47)
**dang, I just realized I forgot to buy wheel cylinders!**

After going to get my axle bearings pressed off, I found that our local O'Reilly machine shop no longer does this; they ship it off to Missouri to have done.  Ridiculous... So instead, I plan on calling up a friend of mine who works at a shop, and ask him if I can come by and get these bearings pressed on.  In addition to this, he's planning on working on my Clutch Pedal Bracket Support, which I'll post on a little more later this week.  Hopefully I'll get to knock out 2 birds with one stone.

Right now - quickly, before my parts all arrive - I'm finishing off the sanding, and getting the parts prepped and painted.  The idea at the moment is to paint the axle housing black, with the third member red.  The drums will also be painted, but I'm thinking just a "hammered steel" type finish; not a crazy color like red or anything.

As I mentioned a few posts ago, I got a lot of sanding equipment for this very reason, such as a full face shield and earmuffs.  I used them again today when I finished sanding down the axle housing, and began on the brake brackets (is that what they're called?).  I tell you, it's a lot of work getting everything down to bare metal but it should pay off in the prevention of rust down the road.  I'll upload some pictures in part 3 of this little miniseries.

That brings me to one last point before I head to bed...painting.  I've long debated my decision / ability to paint, and after spending a little time doing research today, I think I'm leaning more towards the "set up a paint booth and paint it myself" approach.  While it will be expensive - probably close to $1000 counting all expenses - it's far cheaper than spending several thousand to pay someone else to do it.  One of the biggest costs associated with painting is not the paint, but rather the prep work & post work (wet sanding, etc.).  Time, I have. 

Thursday, August 25, 2011

Rebuilding the 8-inch rear end, Part 1

Several years ago, I bought an 8" rear end from a guy, and it has sat, pretty much untouched, ever since.

I decided it's time to clean this thing out and rebuild it myself, with the exception of the third member.  So, last week I hooked up the wire wheel to the angle grinder and went to town.

This week, after doing some research, I began working on removing the axle bearings, seals, etc.  A friend and I had pulled the axles a few years ago, but the axle seals were still inside the housing, and were not budging.  After several hours though, they finally pried loose, and cleanup began. 

Here's how the axle housing looked, before using Simple Green Max degreaser to clean up the inside.  I'd guess this crud was 1/8" thick.


After using the Simple Green and several rags...


From All Mustang Pics


Not all the way clean, but much better.

I also cleaned up the axles using Simple Green, and gave the axles a very light sanding to remove some of the oily varnish sludge gunk stuck on them.  Sanding the housing was quick with a wire wheel, but not very accurate.  Using a foam sanding block took care of the curves and tight spots, but was expectantly slower.  Now to go get these bearings pressed off, and new ones pressed on.

Tuesday, August 16, 2011

Good news, I think.

Supposedly the leaf springs are finally on a freighter on their way over here.  Should be like 30 days...we'll see.


Monday, August 15, 2011

Sanding & Prep work for POR15

Over the weekend, I picked up a variety of tools from Harbor Freight (sister works there now, hello employee discount!).

I grabbed a variable 6-speed multi-tool (more on that later), with attachments
Six 2" steel-spring clamps
A full-face shield
Earmuffs
5" Orbital sander
Sanding blocks
Sandpaper

After sanding with the orbital sander for a while, I hadn't gotten very far.  I was using 60 grit paper, but the Mustang has a ton of curves and small ridges that make it difficult to sand over.  I was perplexed...  I bought the sanding disks and started manually sanding.  I had tried a wire wheel before but had gotten nowhere, as it wouldn't pull the coat of original paint off the metal.  Luckily, I spoke to my friend who informed me that wire wheels, while they look like they're still good, can lose their effectiveness.  I quickly swapped mine out for a new one I still had in the packaging, and it removed almost all the paint on the left fender apron.  I hope to have the rest removed by tomorrow, but I'll need to pull the transmission out of the bay to get to the firewall.

As for the sandpaper and Orbital sander, I guess I will just keep it for the hood, panels, etc.  Kind of regret buying that. 

The Oscillating Multifunction Tool was bought for one reason in particular - scraping the undercoating.  I have long heard horror stories about how much time & effort it takes to remove the stock undercoating from the Mustangs, and the de facto approach to removing it is a propane torch and putty knife, slowly scraping off what you can.  Well good news, the Multifunction Tool did both my rear wheel-wells in just a few minutes*.  It was worth every penny.  Now I'm sure I can use it for 1,000 other things,

* The wheel-wells are curved; the scraper is not.  You're going to run into this with the Multifunction Tool or a putty knife, so there will be some manual labor scraping off what is missed in the nooks & crannies.

The Unofficial POR15 Plan

I don't quite know if this is how it's going to be done, but I think this is close.  I need to write down my ideas because I'll forget them if I wait 20 minutes, then I have to think it all up again :-D


Remove undercoating, top layer of grease/oil/junk
Remove any paint & primer
Clean w/ Soap & Water
Apply Marine Clean
Wipe down with wet sponge, dry.
Apply Prep & Ready
Wipe down with wet sponge, dry.
Apply POR15 to engine bay panels, frame rails, and underbody, and floor pans
**After 2-6 hours, POR15 will become tacky**.
Immediately apply topcoat to engine bay and frame rails.  Still unsure on what Topcoat I'll use.  I like the Satin look.
---- (later) ----
Apply Marine Clean to underbody
Wipe down with wet sponge, dry.
Sand underbody with 300-grit sandpaper
Apply self etching primer to underbody
Reapply after 3-12 hours
Apply Red Oxide Primer to underbody (I'll be honest.  I don't understand really why the primer is the final coat?) 

Well that is all for tonight. 

Wednesday, August 10, 2011

New parts and lots of work done

Well, we're in the hottest summer on record, here in DFW.  I don't even know how many consecutive days it has been over 100* F, but I believe it's somewhere around 40.  Nights dip down to the balmy 90s.  And yet, I'm making a ton of progress on the Mustang. 

As I mentioned in my last post, my wife and I are teaching swimming classes for the 2nd summer in a row, and the extra money is wonderful; my wonderful wife is putting it all in the Mustang Fund.  So I've managed to pick up a few parts over the last few weeks:

  1. Finally found a Duraspark II intermediate harness (from ignition module to distributor) for $5, off of a 75 V8 LTD, I think.
  2. Picked up a T-5 Crossmember off of eBay for $92 after shipping.  Not a bad price.  It's the tubular design.
  3. Ordered the POR15 Power Mesh (which is basically Fiberglass...that's....it).  
  4. Ordered a DIN radio adapter off of Amazon.  It's a plastic box that you can screw under the dash, though I will likely velcro it.  I hate drilling holes in the dash.
  5. Ordered the Mr. Gasket #925D distributor recurve springs (see below)

I used the Duraspark II recurve instructions found widely on the web, and swapped the lighter spring with the #925D spring.  This spring requires slightly less force to stretch it the same distance, so it will cause the timing to advance at a faster rate.  In addition, I flipped the "slots" (I am not aware of the technical term), so instead of a 15R, I am now running a 10R.  The 10R is a smaller width slot, so the mechanical advance is smaller (20 degrees vs. 30 degrees for the 15R). 

So, why do this?  Well, I will need to increase the initial advance (you know, turning the distributor) an extra 10 degrees to compensate, and that will greatly benefit the engine.  After this, I reattached everything, and found out one of my spark plug wires was too short.  Awesome, lol.

Then for the tough work...

After a few afternoons working in the garage, I finally got the old 7" rear end completely separated and removed from the car.  After many attempts to finagle the exhaust pipe out from under the car, I gave up and cut it in half.  That leaves me with only the transmission & driveshaft, which are actually just sitting under the car; not actually attached. 

The new rearend has been wire-wheeled down to bare metal (and rust) but I still need to have it rebuilt, and put a new ring & pinion in it.  The stock 2.79 gear will be a bear to drive with a T5.  If I am able to acquire a 4-cylinder T5, I'll use 3.25 gears.

I'll give a concise little time-line of what is left (this might be scary...)

Grind all undercoating/dirt/mud/crap off the underside of the car
Apply POR15 to the engine bay, interior floorpans, and underside of car. 
Follow this with a topcoat of a semi-gloss UV protectant paint, to the engine bay.
Apply stripping chemicals to the fenders/doors/hood/roof/etc. to remove old paint.  Scrape off and begin sanding.  (This means I'll have to remove the glass & headliner.  Dangit)
Rebuild and re-install rear-end; install rear suspension, front suspension, front disc brakes, and rebuild rear brakes.
Install all new brake lines, master cylinder, proportioning valve, and distribution block. Bleed brakes.
Attach wheels/tires
Install sound & heat deadening to interior, inside of doors.
*** At this point, I should have a rolling shell, minus engine and transmission.***
Install T-5 crossmember, clutch pedal bearing kit, and heim-joint Z-bar modification
Install Engine, Transmission, and Exhaust system
Paint.
Rewire the car
Attach miscellaneous electrical items, speakers, etc.
Install interior.

Time to get on it!

Wednesday, July 20, 2011

Looking for parts...

In addition to working a little side-job for the summer, to raise extra money for the Mustang, I've been hunting parts.  They're not necessarily hard to find, but they are hard to find for a good price.  Here's my current list:

87-93 T-5 from an Inline-4 Mustang
found but the guy wanted $375.  No way!
1980-1982 Ford Inline 6 cylinder head (E0 casting)
found but the guy wanted $75.  Will have to check one more place...
1985 V6/AOD Thunderbird Driveshaft
haven't found yet
197?-8? Duraspark II Ignition module
haven't found yet

Thursday, February 24, 2011

Haven't posted in a while

But don't fret.  I'm still here :-)

Money is a funny thing.  It's magic - it does a better disappearing act than Houdini.  :-/

Tuesday, January 18, 2011

Shocker

5 weeks later, and the rear springs are still not here from Dallas Mustang. 

I spoke with a POR15 rep today.  This is not going to be easy, but here's the outline of how this is going to get done:

  1. Interior floor pans and front fender aprons will be thoroughly washed down with aircraft stripper.  This should remove any traces of paint.  
  2.  The aircraft stripper residue will be removed with many sponges and very hot water.
  3. What isn't removed will be sanded off.
  4. All areas of the car receiving rust-preventative paint will get a thorough washing of Marine Clean, to remove any grit, grime, oil, etc.
  5. Many more hours will be spent with a sponge and HOT water, washing off the Marine Clean.
  6. The Metal Ready* will be sprayed on the car to remove rust, etch the metal, and prepare for the POR15 paint.
  7. Once again, hours of wiping off the above with a sponge and hot water.
  8. Before the next step, I will apply some thick tape on the underside of the car, where pinholes exist.  
    1. The best solution would be to remove the pans and weld in new ones.  Unfortunately I do not have the experience to do this, nor do I have the tools.  I could learn/pay someone, but I feel that the very minimal improvement made by putting in new pans would not offset the cost.  The pans have been given several "tests" and they are very solid.
  9. Now that the metal is ready (get the pun?) the POR15 Rust Preventative Paint will be applied with foam brushes.  The paint is self-leveling, so foam brushes should work fine.
  10. After one coat of POR15, I will put down a layer of POR15 Power Mesh on the floor pans with pinholes.  This is a reinforcing fiberglass type material that will provide a little extra stiffness, and will seal the pinholes from the underside.
  11. 2 more coats of POR15 will be applied.
  12. Tape will be removed from the underside.

*Metal Ready has apparently been renamed to "Prep & Ready"

Wednesday, January 12, 2011

Someone is an idiot.


Click on the image to enlarge it.  You'll see that, yes, that is BLACK TAPE used as "racing stripes" and they did in fact create a large gap by doing a crappy job at it.  It's just....so....so bad.  This is why ricers need not buy Mustangs.

Wednesday, January 5, 2011

What was actually done...

Due to some very unexpected family issues (not bad ones!), I was actually out of town most of the break.  That's okay though, I wouldn't have accomplished a lot, as I needed some specific things I did not have.  Here's my previous list, with what was actually accomplished, and my excuses (they all stink).
  • I got some more sanding done on the front...just about all of it is gone.  Hopefully I can get the last of it.  Shouldn't be too hard.  
  • I'd like to get some aircraft stripper and give it a whirl on the fenders/hood, to see how much crap I can remove.  Problem with that is, I don't really know what to do after that.  After stripping all the paint off, to bare metal, I'm pretty much guaranteed to get surface rust on the body.  I'll need to coat it with something, but I don't know with what, or how to coat it.
    •  Didn't do this out of fear that the "fresh" metal would rust.  I need to pick up some more primers & rust preventative before I start this.
  • This is not really a goal, but would be a nice milestone.  I am supposed to pick up my leaf springs from Dallas Mustang, but I'm not sure if they'll have them this week.
    • Shocker, they didn't have them, and still don't.
  • I will attempt installing the clutch and brake pedal parts on the brake pedal support bracket.  But, I'll also be removing said bracket, to get it ready for welding (roller support bearings).
  • Thought about removing the stock export braces, but, I'd like to remove the engine eventually, and redo the engine bay...maybe.  Sheesh it sucks that I'd have to strip all of that off, after I primed & spray-painted it a couple years ago.  But, do I want to do it right?  Maybe.  Decisions decisions...
    • Removed a lot of the wiring, brake lines, etc. from the engine bay, as well as started getting it ready to pull the engine.  I also started to drain the antifreeze, only for it to barely drain out any.  I had to squeeze the hoses over and over to get it to pump out of there.  I then remembered I don't have my lift bar, which I need.  So I will get that, and I can proceed to pull it out of there, and remove the C4 (to sell).
  • Sanding down the interior, and removing the rear quarter panel parts.
    • Nope, didn't get this done, besides removing the rocker panel mouldings.

Now time to spend some more money on prepping paint stuff!

Sunday, December 26, 2010

Some ambitious goals for this week...

I've got a couple more pictures of the newly shipped suspension parts (coil springs, insulators, U-bolts), but I thought I'd post on what I hope to accomplish this week.  My company gives us off the week after Christmas (well, this year anyway), so I hope to get quite a bit done.

  • I got some more sanding done on the front...just about all of it is gone.  Hopefully I can get the last of it.  Shouldn't be too hard.  
  • I'd like to get some aircraft stripper and give it a whirl on the fenders/hood, to see how much crap I can remove.  Problem with that is, I don't really know what to do after that.  After stripping all the paint off, to bare metal, I'm pretty much guaranteed to get surface rust on the body.  I'll need to coat it with something, but I don't know with what, or how to coat it.
  • This is not really a goal, but would be a nice milestone.  I am supposed to pick up my leaf springs from Dallas Mustang, but I'm not sure if they'll have them this week.
  • I will attempt installing the clutch and brake pedal parts on the brake pedal support bracket.  But, I'll also be removing said bracket, to get it ready for welding (roller support bearings).
  • Thought about removing the stock export braces, but, I'd like to remove the engine eventually, and redo the engine bay...maybe.  Sheesh it sucks that I'd have to strip all of that off, after I primed & spray-painted it a couple years ago.  But, do I want to do it right?  Maybe.  Decisions decisions...
  • Sanding down the interior, and removing the rear quarter panel parts.

Oh well, time to get to work.

Tuesday, December 21, 2010

Shipment #1


And there's more to come!

Monday, December 20, 2010

Vendor Complaint

I'm not normally one to complain about vendors because I think they all have their pros and cons (just the nature of the business), but as a former restoration parts business-owner, this kind of thing irks me.

Mustangs Plus is a good company.  They provide a large variety of parts, at good costs, and have good catalogs and service.  I went to purchase a 4-1/2 leaf mid-eye leaf springs kit (the kit comes with the springs, shackles, 2 bolts, and the U-bolts), and proceeded to checkout.  Since leaf springs are obviously very heavy, I knew about the $15 box charge their site specified.  No big deal.

However, upon arriving at the shipping confirmation page, I noticed the additional shipping price was VERY high - $59 and change, bringing the total to about $75.  I guess I would have dealt with this, as shipping this from California can cost quite a bit. 

UNTIL...I checked what the shipping would be on just the leaf springs.  So, excluding the shackles, 2 bolts, and U-bolts, the shipping was $41.  Surely the price to ship these objects does not come out to $18.  So, I called Mustangs Plus on this.  After speaking with the customer service guy (who agreed, by the way, that they could ship it all in one box and it would be close to $41), he said the shipping would be....

HIGHER!?

Yes, $65, plus the original $15 box fee, which comes out to $80.  So after originally agreeing the price should be ~$41 + $15, he "changed his mind" saying it should be $80.  No thanks, pal.  I don't appreciate a company
  1. apparently trying to make their profit off of shipping
  2. changing their shipping policy after I could have ordered it at a lower price.  
 So in the end, CJ Pony will get my business for the shackles and U-bolts, because they offer free shipping.  And Dallas Mustang (though I despise them) will get my order for the leaf springs.  They were the only other company I could find offering the 4-1/2 leaf mid-eye leaf springs.

Until tomorrow, when I can post some pics...

Wednesday, December 15, 2010

Tuesday, December 7, 2010

Sanding and more sanding

I'm making a lot of headway on sanding the front aprons.  Admittedly, I wish I was a lot further along than I am, but I'll do what I can.  Obviously with the holidays being among us, things are a lot more busy.

I picked up a few tools this past weekend:

A set of 4 chisels, ranging from 1" wide to 1/4" wide. 
A set of snap ring pliers
A 5-piece set of new pliers/cutters. 

The chisels are for the nasty undercoating crap all over the body.  The snap ring pliers are for the eventual T-5 rebuild, and the pliers/cutters are just for having :)

Well, that's all for this evening.  I'll probably have more time to work again on Thursday evening, and will hopefully "finish" one or both sides of the aprons.  Then I can move on to the front...and who knows where I'll go from there.