Showing posts with label sanding. Show all posts

Thursday, November 3, 2011

Scored a Compressor!

I'm excited about the deal I scored today!  I had been monitoring the sales and prices of compressors around here and online, when I ran across the Morgan Series 60 gallon compressor on Northern Tool's website.  It's Reconditioned, but I don't mind as I picked up a 1-year warranty for no-hassle replacement.  Here are the compressor's specifications:


HP
3.7
Volts
240
CFM at 90 PSI
11.5
Max. PSI
155
Tank Type
Vertical
Air Tank Size (gal.)
60
Stage
Single
Drive
Belt
Motor Phase(s)
Single
Air Outlet Size (in.)
3/8
Portable or Stationary
Stationary
Pump
Cast iron, in-line twin, oil lubed
Manufacturer Warranty
1 month parts / 1 month labor
Ship Weight
245.0 lbs
Item#
211112
 
The hardest part about it is going to be the unloading.  I'm pretty confident about securely strapping it down and transporting it home (a mere 3 miles or so), but unloading it and carrying it into the garage will be tough.  As well as wiring a 240V connection.  And 240V 40A circuit breakers aren't cheap, either. :-)
 
As for what I plan on using this for, I will be shooting primer and some paint, as well as hooking it up to a sandblaster and cleaning up a few small parts for the car, which will need to be painted.  That will be wonderful :-D

The other thing I've been working on is the tedious - and dirty - task of removing the undercoating.  First, I had to replace my Multi-Tool with a new one after only a few weeks, due to poorly made junk.  But I don't really mind...swapping it out was free and I paid nearly nothing for it to begin with.  

So I began using the scraper blade attachment, and sort of skimmed off the thick layer of undercoating.  There appeared to be 2 types of undercoating.  One was black/darker, and one was very light, almost beige.  The darker undercoating came off with little effort.  The beige undercoating took LOTS of elbow grease to get it off, and even then, a lot remained stuck on.  Anyway, after a while, I moved on to the angle grinder, taking off the light coating of undercoating that remained.  The result was phenomenal!  The Red Oxide Primer underneath was still in great shape, with very little to no surface rust.  There are a few holes, though, from above (floor pans).  That's a different story.  

So, I spent the better part of the evening vacuuming all that crap off the floor, and I'll be back under it next week, scraping and grinding and vacuuming some more.  But until then, I've got to dream about painting!

Thanks for stopping in.

Saturday, October 29, 2011

Air and Paint and What to do?

I've been inundated with baseball lately, but in the meantime, I've been doing quite a bit of research on all this painting stuff.  Here's about what I have come up with, for my paint setup.

For my compressors, I'm still undecided on which method I will go, but here are the two I'm looking at.  In both cases, I am coupling 2 compressors together, as it is much cheaper than buying one large compressor.

Compressor Option #1
  • Harbor Freight's 2HP 10-gallon Compressor (2)
  • 20 Gallons combined volume
  • 12.4 SCFM @ 40 psi (each compressor is 6.2 SCFM @ 40 psi)
  • 120V, 14.1 A
  • Price is $220
Compressor Option #2

  • Husky 1.8HP 20-gallon Compressor (2)
  • 40 Gallons combined volume
  • 12.2 SCFM @ 40 psi (each compressor is 6.1 SCFM @ 40 psi)
  • 115V, 13.5 A
  • Price is $240 
  • (Note, this just went out of stock...how awesome :-\ )
 So for $20 more, I get 20 gallons more, though I am getting 2 reconditioned compressors...

The next step in my research was to find what sort of sequence I would be doing all this in.  If you remember back, I'm planning on using a little bit of POR15 (not everywhere like crazy), epoxy primer, seam sealer, and some engine bay paint.  Actual exterior paint will be determined at a later date.

So here's what I came up with:

1. Sand/Strip the Engine Bay, Interior, and Underbody
       a.  I've now been informed that, if the bond between the stock paint on the interior, and the metal, is good, then just scuff it up really good and epoxy prime it.  This will keep me from having to do so much Chemical stripping, which I am not a fan of.

2. Prep the Interior and Underbody where POR15 will be applied (Marine Clean and Prep & Ready)
3. Apply POR15 (or...?) to the floor pans, and possibly some areas in the engine bay.

4. Spray on Epoxy Primer over POR15 while tacky? (Still not sure on this)

5. Apply Seam Sealer where there are seams.

6. Spray on 2nd coat of Epoxy Primer over POR15, and coat the rest of the areas in primer.

7. Paint everything from the firewall > forward with Eastwood's 2K Ceramic Underhood Black (as well as the front frame rails behind the firewall). I'm going to have to build a mini paint-booth around my engine bay for this.
From here I can move on to taping off all the underbody (which will be primed in Red Oxide) and the engine bay (now painted in 2K Underhood Black), and Prime/Paint all the exterior. Thankfully though at this point I should be able to reassemble most of the drivetrain/suspension/steering, so I can move the car if necessary...perhaps to a real painter.

I'm still not decided on what guns I want to use, but Husky has a 2-gun kit, complete with extra hoppers and a full cleaning set.  It's a pretty good deal, too.

Tuesday, October 18, 2011

Lots of work and not much done

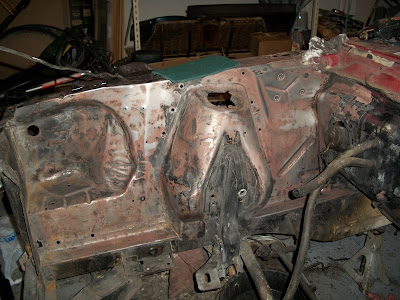
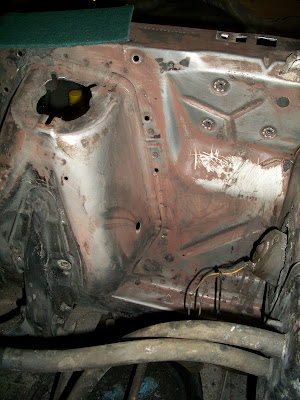
I knew this would be tough, but I really didn't expect this much work.  I've been working on removing the paint from the engine bay, and it's a very slow process.  I think part of this is just due to the fact that I didn't leave the Citristrip on there long enough (it's hard to block out ~4-5hours of time for this), but part of it is, the stuff just isn't a 1-time-does-it-all product.

But the worst part of it all is the paint remover afterwash.  This is the stuff that inactivates the paint remover, and washes it away.... which sounds great except it:
1) is noxious (hence a respirator),
2) quickly evaporates,
3) Doesn't do all that great of a job of "washing" away the stuff - more like it makes it wet, then evaporates.

So it takes a lot of scotch-brite pads, steel wool, and patience, to get the stuff off.  But, I'm somewhat pleased to say that the Passenger side is mostly done, with the only thing remaining being (what appears to be) some primer and a few spots of paint.


While I'm at it, I'll talk about my ideas regarding the paint.  I've talked about them multiple times, but I'm still undecided.

All this tedious work brings up the question, why am I taking this engine bay down to clean metal and planning on applying POR15?  POR15 is meant to be applied to seasoned (aka rusty) metal, so I have a dilemma.  I don't know if I should even bother applying POR15 to the inner fenders, engine bay, etc., if all of that area stayed rust free to begin with (covered by factory paint). Or, do I take the other approach, and apply it to provide further preventative maintenance? 

I really like POR15, which, like everything, has benefits and consequences. POR15 is a rust encapsulator, and the biggest fault in my opinion, is that it is UV-sensitive.  This means it must be topcoated with another product, and I honestly wonder if I'm just wasting time & money.  One thing is for sure - I'm going to apply POR15 to the underside and interior floor.  That area WILL rust, even if painted, so getting the POR15 on there should result in a longer-lasting floorpan.

As for any other news, I can't say there is too much.  I've mainly just worked on the metal.  I test-fit my Export Brace, which looks like it should go in with minimal problems.  The heater has been removed to aid in firewall paint removal, and should also help me get some more of the crap out of the cowl area.

Thanks for checking in.

Sunday, August 28, 2011

Rebuilding the 8-inch rear end, Part 2

Thought I should give an update, now that the parts have been ordered and cleaning is nearly complete.

The total cost of the parts, shipped & taxed where necessary, was $92.15.  All parts except the Brake Hardware Rebuild Kit were purchased from Rockauto.  A breakdown of what you'll need:

2 Backing Plate Gasket - Outer ($1.14)
2 Backing Plate Gasket - Inner ($1.40)
2 Axle Bearings ($34.56)
2 Axle Seals ($19.64)
1 Brake Hardware Rebuild Kit ($7.55, from O'Reilly's)
1 set of Brake Shoes ($15.39)
1 Shipping from Rockauto ($12.47)
**dang, I just realized I forgot to buy wheel cylinders!**

After going to get my axle bearings pressed off, I found that our local O'Reilly machine shop no longer does this; they ship it off to Missouri to have done.  Ridiculous... So instead, I plan on calling up a friend of mine who works at a shop, and ask him if I can come by and get these bearings pressed on.  In addition to this, he's planning on working on my Clutch Pedal Bracket Support, which I'll post on a little more later this week.  Hopefully I'll get to knock out 2 birds with one stone.

Right now - quickly, before my parts all arrive - I'm finishing off the sanding, and getting the parts prepped and painted.  The idea at the moment is to paint the axle housing black, with the third member red.  The drums will also be painted, but I'm thinking just a "hammered steel" type finish; not a crazy color like red or anything.

As I mentioned a few posts ago, I got a lot of sanding equipment for this very reason, such as a full face shield and earmuffs.  I used them again today when I finished sanding down the axle housing, and began on the brake brackets (is that what they're called?).  I tell you, it's a lot of work getting everything down to bare metal but it should pay off in the prevention of rust down the road.  I'll upload some pictures in part 3 of this little miniseries.

That brings me to one last point before I head to bed...painting.  I've long debated my decision / ability to paint, and after spending a little time doing research today, I think I'm leaning more towards the "set up a paint booth and paint it myself" approach.  While it will be expensive - probably close to $1000 counting all expenses - it's far cheaper than spending several thousand to pay someone else to do it.  One of the biggest costs associated with painting is not the paint, but rather the prep work & post work (wet sanding, etc.).  Time, I have. 

Tuesday, December 7, 2010

Sanding and more sanding

I'm making a lot of headway on sanding the front aprons.  Admittedly, I wish I was a lot further along than I am, but I'll do what I can.  Obviously with the holidays being among us, things are a lot more busy.

I picked up a few tools this past weekend:

A set of 4 chisels, ranging from 1" wide to 1/4" wide. 
A set of snap ring pliers
A 5-piece set of new pliers/cutters. 

The chisels are for the nasty undercoating crap all over the body.  The snap ring pliers are for the eventual T-5 rebuild, and the pliers/cutters are just for having :)

Well, that's all for this evening.  I'll probably have more time to work again on Thursday evening, and will hopefully "finish" one or both sides of the aprons.  Then I can move on to the front...and who knows where I'll go from there.